Creating additional
suffix/name space in Exchange 2013.
In this tutorial let us have a look at how to add an
additional name space/suffix in an Exchange 2013 server.
For eg : The organization’s name space is something@name1.com ,and the manager
asked to add one more suffix as something@name2.com
to create some mailboxes for our sisterly company.
There are many ways to accomplish this, any way let us have
a look at a method.
In this tutorial i have the mail name space as main.local and i am gonna add main2.local as an additional name space.
Step 1
We have to add a UPN suffix in the Active directory Domains and Trusts.
In the Active directory server go to Active directory Domians and Trusts - Right click - properties
In the "UPN Suffixes" tab - Enter the alternate name - click Add - Apply - OK.


We have done with the UPN Suffix part,let us move on to EAC
Step 2
In the EAC let us create an Accepted Domain,an accepted domain is an authorized SMTP name space used for send and receiving.
Mail flow - Accepted Domains - Enter a name(3) - Specify the domain name (4) - click save.
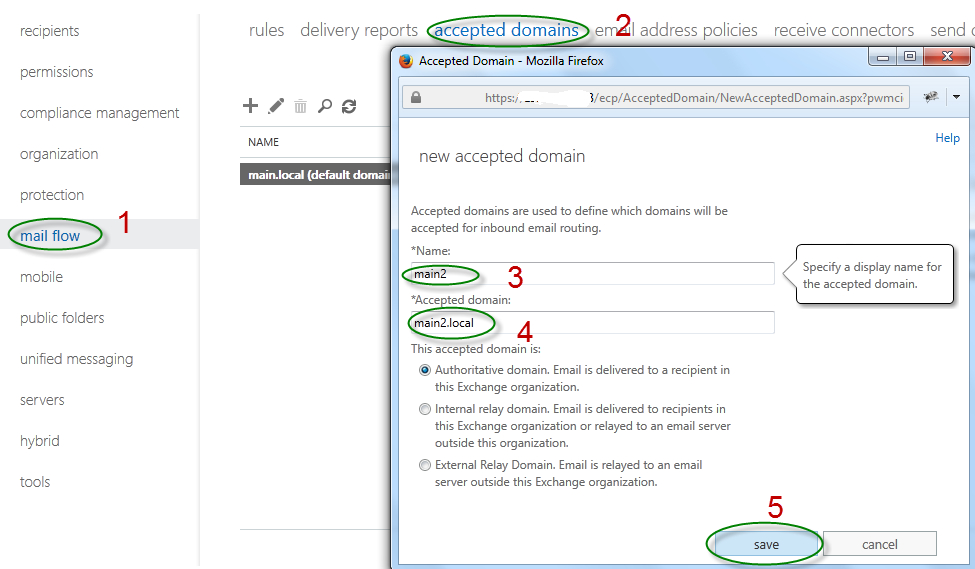

We have to Apply the newly created Accepted Domain for this Click the "Apply" button.

So if everything went fine we will get the newly created domain flagged as "Applied"

Step 3
Hey the things are not yet completed,let us configure who should use the newly created name space.For this let us visit the "Email address policies" tab located in EAC.
In EAC ,Mail flow - email address policies - Click the + to add new policy - Enter the policy name
Click the + sign below Email address format .

Here we have to specify our domain name .Click specify custom domain radio button and specify the domain name that we have to add in our exchange organization.
Click save.

So we have our new Address format.Now it is time to deside who can use this name space.
There is a heading to specify for whom this policy should apply - it is simple just read and try.
Here i am going to use a custom attribute,That is the users who have attribute as "main2.local"
Click Add a rule - custom attribute 1 - specify your desired word - click the + button to add - click OK.


So everything ready.Now let us try creating a user with different name space.
Step 5
In EAC Recipient - Mailboxes - Click the + button - enter details.
In the user logon name click the drop down and choose the newly created name space.

Forget to put the custom attribute :)
Click the user - general tab - More options

Enter the custom attribute
Note : Please enter the attribute that you used in Step 4.

Now you can see the use with the newly created name space.

There will be the main domain's SMTP address for the user.Please remove it from the " email address tab" of the user.

Thanks for reading the article.
No comments:
Post a Comment